Using VTSync
VTSync interfaces directly with both QuickBooks and
Virtual Time+Expense, allowing a seamless two-way flow of information.
 |
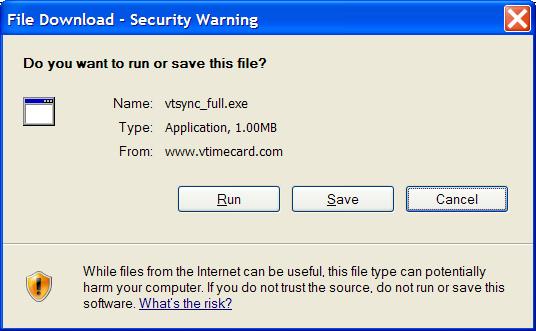
- Download VTSync from this link:
http://www.virtualsoftware.net/Downloads/vtsync_full.exe
Install VTSync on the computer you run QuickBooks from.
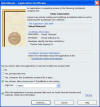
- When prompted to run or save the file, click on the “Run” button
|
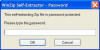 |
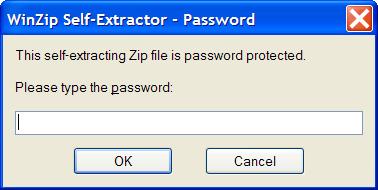
- When prompted for a password, use the one supplied to you by Virtual
Software.
- Complete the installation.
- If you are using QuickBooks
Online (QBOE only), install the connector from this link:
http://www.virtualsoftware.net/Downloads/QBOEConnectorInstaller.exe
- You can now run VTSync at any time
by clicking on the Windows “Start” button and selecting “All Programs,
Virtual Time+Expense, VTSync”.
|
|
Note: If you are going
to use QuickBooks and VTSync in a multi-user environment (more than one
person using VTSync), it is recommended that you install VTSync once to
a network drive (usually the same one that you have your QuickBooks
company data file) where each user would have write access to.
Once it is installed and setup, other users can simply run the EXE (or
create a shortcut to run it) rather than installing it again on their
local machine. This will ensure that all users have the same
settings. |
|
|
- Before running VTSync for the first time, start up QuickBooks and
open your company file. For this initial one time setup, you will
need to login to QuickBooks as Admin and be in Single User Mode.
Once you have completed this one time setup, future uses of VTSync will
not require you to be Admin or run in Single User Mode. Keep QuickBooks
open for the remaining steps.
Before the initial sync, review
your data. “Clean up” and inactivate any information that you do not
want to appear in Virtual Time+Expense (employees, customers, items, etc).
This will make your data pulldowns smaller in QuickBooks, and keep
unneeded data from sync'ing into Virtual Time+Expense.
|
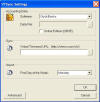 |
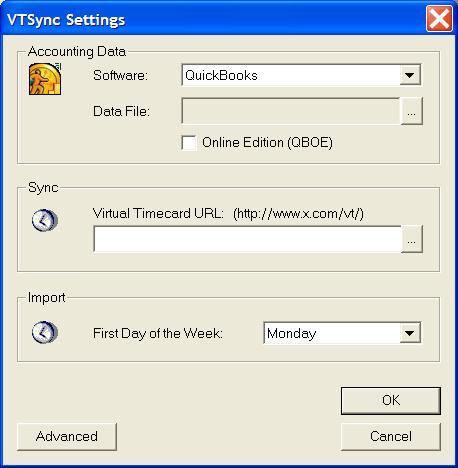
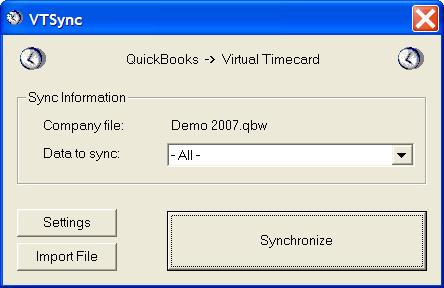
- With QuickBooks still open, run VTSync (again, click on the Windows
“Start” button and select “All Programs, Virtual Time+Expense, VTSync”). The
Settings dialog should appear automatically - if it doesn't, click the
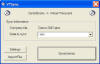
"Settings" button from the main VTSync window. You will see the 3
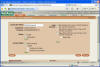
primary required settings: the QuickBooks data file, the Virtual Time+Expense URL, and your First Day of the Week.
|
|
|
- The following steps will help you select your QuickBooks data file
and allow VTSync permission to access it.
If you are using QuickBooks Online Edition, check "Online Edition (QBOE)"
and skip the next step.
|
 |
- QuickBooks Desktop First
Sync - Allowing Access
If you use QBOE, skip this step.
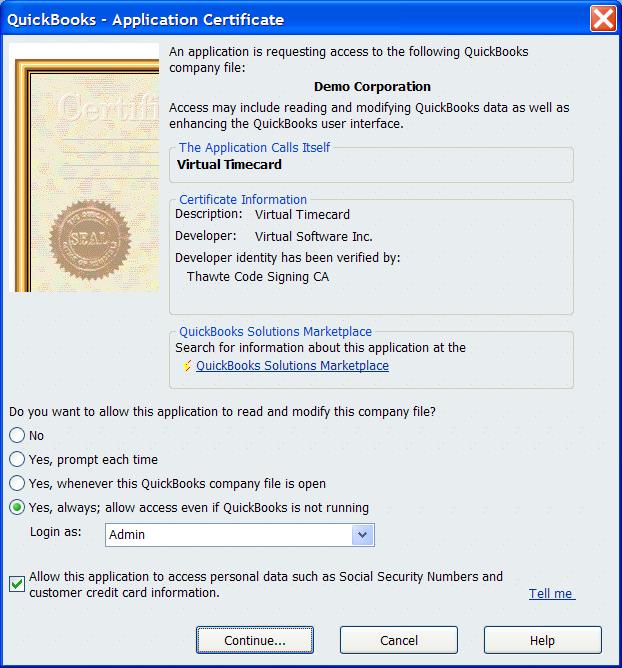
Select your QuickBooks (Desktop) company data file (you should still
have QuickBooks open from step 1 above) by clicking on the "..." button
to the right of "Data File:".
You will be asked if you want to auto select this file - the answer is
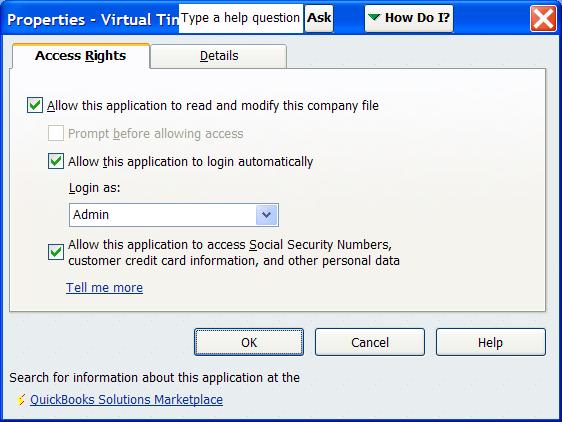
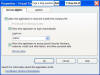
"Yes". At this point, QuickBooks will prompt you, asking if you
want to allow Virtual Time+Expense to access your data. Select "Yes,
always; allow access even if QuickBooks is not running". If a
user selection shows, select the "Admin" user. Also, select "Allow
this application to access personal data".
Click "Continue" then "Done". You will be returned to the VTSync
settings dialog, and your QuickBooks data file should be filled in for
you.
You can change these permissions again in the future from within
QuickBooks by selecting the Edit menu, Preferences, Integrated
Applications, Company Preferences tab, selecting "Virtual Time+Expense" from
the list, and clicking the "Properties" button.
|
 |
To view or modify these access rights in the
future, do the following:
|
|
|
- Fill in the URL to access Virtual Time+Expense - this is the link you
use to login using a web browser. If you use Virtual Software's
website, click the "..." button to the right of "Virtual Time+Expense
URL:". When asked to auto select, answer "Yes".
If you installed Virtual Time+Expense on your own server, enter the correct
URL to access it (example "https://www.vtimecard.com/vt/").
- Select the correct "First Day of the Week". For
example, Monday means your week is Monday-Sunday.
|
|
|
- Click OK to save the settings. You will be shown the main
VTSync window and are ready to sync data for the first time!
|
 |
- If VTSync is not already open, run it now (again, click on the
Windows “Start” button and select “All Programs, Virtual Time+Expense,
VTSync”).
- Choose what you want to sync by selecting the "Data to Sync".
By default this is All and will sync each data list. By selecting
a specific list here (for instance if you know you have only added a
customer), you can do a quicker sync. The first time you should
select All.
- Click on the main 'Synchronize' button within VTSync to sync all
your data in one step.
|
|
|
- QuickBooks Online (QBOE) First Sync -
Allowing Access
If you are not using QBOE, skip this step.
|
 |
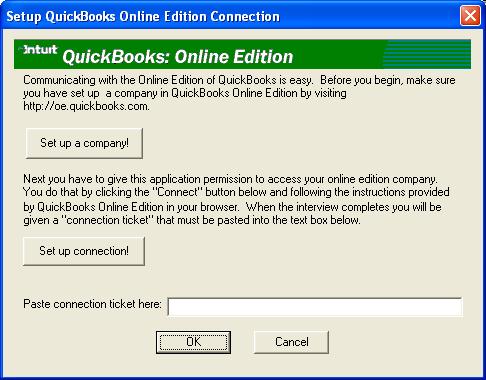
- The first time you attempt to connect to QuickBooks Online, you will see the
Setup QuickBooks Online Edition Connection dialog box.
Select "Set up
connection!". The Connection Interview web page will popup.
|
 |
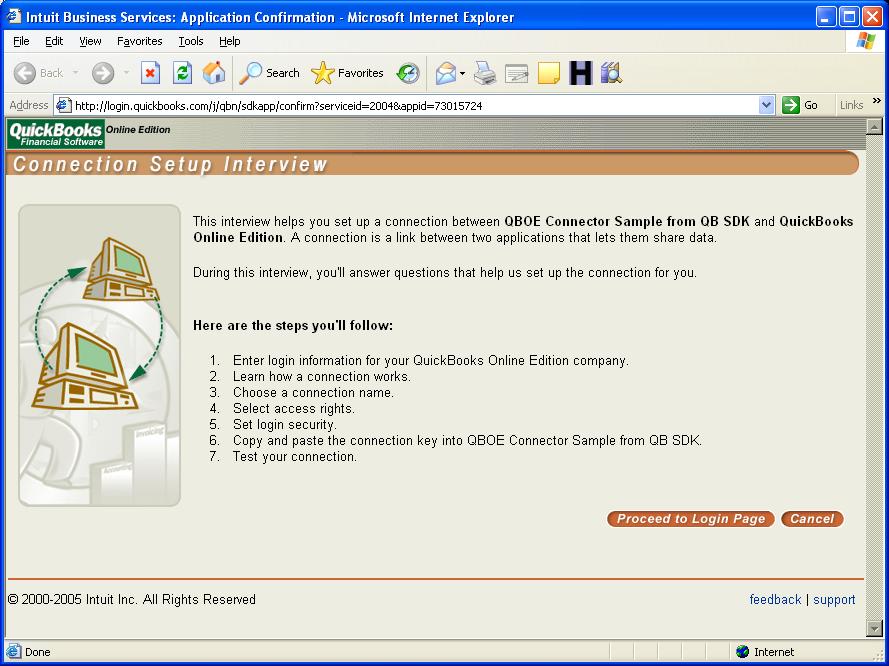
- Click "Proceed to Login Page".
Login using your QuickBooks Online Edition
username and password and select your company if necessary. If you get a
warning about installing ActiveX components, go ahead and follow the
instructions to allow them to be installed.
The interview will start - click "Continue".
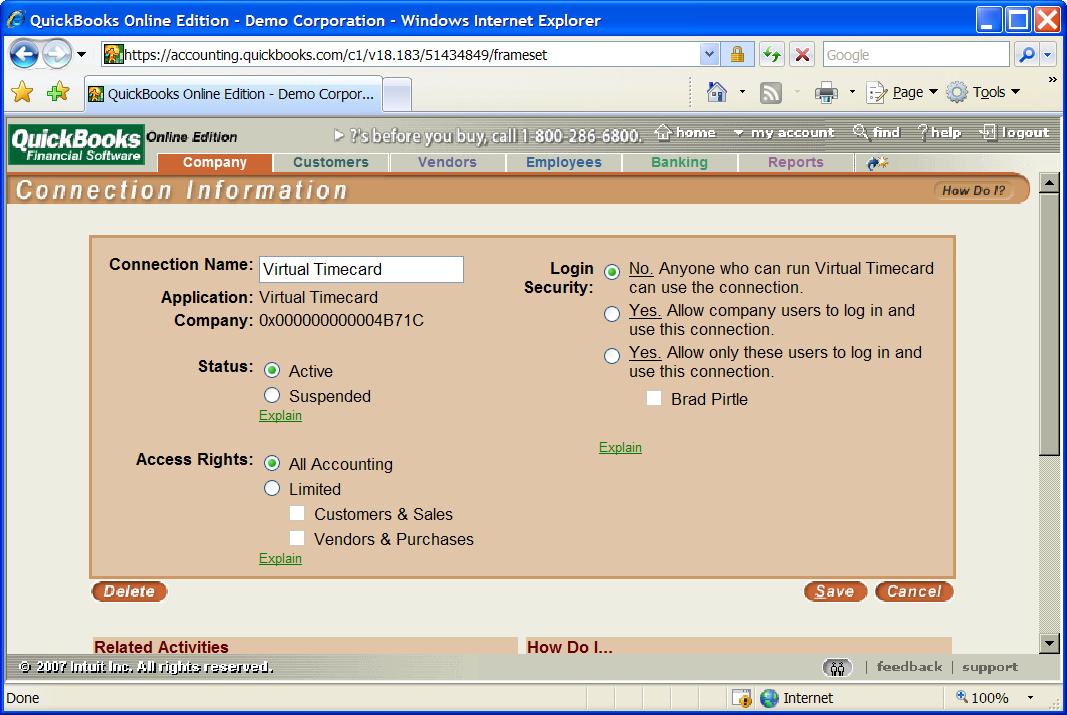
- Name the connection "Virtual Time+Expense".
- Select access rights for "All Accounting". This is
required to
access the list data. Click "Continue".
- For Login security, select "No. Anyone who can run Virtual Time+Expense on this computer can use the connection." You can
select "Yes" for all or selected users, however you will have to login
to QBOE every time you sync or import (so this is not
recommended).
It will ask you if you are sure, click "I still want to turn off login
security". Remember this allows VTSync to access without a
login - your employees will still have to login to use QBOE itself.
- Click "Create Connection".
- You will now be given a "Connection Key". Click "Copy to
Clipboard" (allow access if prompted), then "Continue", then "Finish".
This will close the interview window and return you to the initial Setup
a Connection window. In the field "Paste connection ticket here:"
field, right click, select "Paste". A long string
(example: "TGT-55-fa7M5KLXeXizPC$7aYJbmA") should appear.
- Click OK. VTSync should continue and successfully access your
QBOE data!
|
 |
To view or modify these access rights within QBOE in the future, do the
following:
|
|
|
- Each data list (terms, employees, customers, etc.) will be synchronized one at a time. After sync'ing each data
list,
VTSync will show you a summary of what was added or modified (if anything), and will tell
you if there were any issues. When you have reviewed the results for a
data list, click continue to go on to the next one. If there are any
errors (or possibly warnings), it is recommend that you cancel the sync, resolve
the issue(s) in QuickBooks or Virtual Time+Expense, and start the sync again.
|
Below you will find a description of each data list that is sync'ed
during this process.
|
1. Terms |
Terms are used to express when you expect to receive payment from a
customer. Examples: 'Due on receipt' and 'Net 30'. |
|
2. Classes |
Classes are a way to classify transactions (timecards, invoices, checks,
bills). If class tracking is not enabled in QuickBooks, there will be
nothing to sync. |
|
3.
Accounts |
Accounts are used to track your billables (accounts
receivable) for income, and your payables (accounts payable) for your
payroll and expenses. By default
income accounts are sync'ed - to sync expense accounts, in Virtual Time+Expense
go to Admin, My Company and either enable Expenses or check "Sync Expense Accounts" in the Defaults
section. |
|
4.
Items |
Items are used for invoicing. |
|
5.
Payroll Items |
Payroll Items are used to associate hours in a timecard to
the appropriate payroll type (normal, overtime, etc).
* If you do not use Payroll Items, or if you use the defaults (normal hours = 'Hourly Regular
Rate', overtime = 'Overtime Hourly Rate' etc), you do not need to sync
payroll items.
If you use non-standard Payroll Items, first sync your
payroll items to Virtual Time+Expense, then set up your preferences to use the
correct ones (in the Admin section, click 'My Company' and select the
payroll items you use in the 'Timecard Payroll Items' section, and click the
'Save' button at the bottom). |
|
6.
Employees |
Employees become Virtual Time+Expense users. These will
most likely be your W2 employees that submit timecards, or your W2 internal
personnel (for example in the accounting department).
If an employee does
not sync, verify that it is active and does not have a Release Date
(Employment Info tab). |
|
7.
Vendors |
Vendors are used for both 1099 contractors and CorpToCorp consultants
(working through another agency or company). By default, Virtual Time+Expense will not sync all vendors - this is because vendors are also used
for things like the phone company, which would obviously not be submitting
time. To get a 1099 vendor to sync with Virtual Time+Expense as a
user, do the following:
QuickBooks Desktop: Assign the vendor both a
first and last name in each field (besides just the 'Vendor Name'. Assign the vendor Type = '1099
contractor' (edit the vendor in QuickBooks, click the 'Additional Info' tab,
and set the type) - if this type doesn't exist, create it.
QuickBooks Online: For the name click the "Full Name" button (left of the name
field) and verify that both the first and last name fields are filled in.
Check "Track payments for 1099".
Note
that when sync'ing with Virtual Time+Expense, the "Display Name" is the matching
field for VT's "Bill Name", the "Print As" field is used on checks, and the
"Full Name" will be listed on checks address field (followed by Company Name
if used).
* If you do not use 1099 contractors, you do not need to
sync Vendors.
* CorpToCorp vendors can have multiple contractors working through them -
because of that you cannot sync them directly (not an individual). To
handle these type of users, in Virtual Time+Expense create a company with the
same exact name as the vendor in QuickBooks, and change it from a Customer
to a Vendor. Then create a new user for each CorpToCorp consultant,
set the type to "CorpToCorp", and set the External Employer to the company
you just created. |
|
8.
Customers |
Customers (and Jobs) become Virtual Time+Expense projects. They
contain the information for entering timecards, generating invoices, and
generating payables. By sync'ing your customers, Virtual Time+Expense not
only updates the basic information like name and address, but will also make
sure that each project uses the correct terms, class (if you use classes),
and sales rep (if you use sales reps). If a customer or job does not sync,
verify that it is active, the Job Status is not Closed, and there is no End
Date (Job Info tab). |
|
9.
Tasks |
Virtual Time+Expense has the ability to add an additional pulldown to the
timecard called Tasks. These can be user defined, or sometimes can be
used to pick either an Item or a Class. If you want Virtual Time+Expense to
automatically link the task list to your Item or Class list, do the
following:
* Enable tasks in Virtual Time+Expense (Admin, My Company, Defaults section,
"Use Tasks")
* In VTSync, click the Settings button, then the Advanced button.
Check either "Sync Items as Tasks" or "Sync Classes as Tasks", then click OK
twice. Now it makes a set of tasks
automatically linked to each item or class. |
|
You have now sync'ed all your basic data with Virtual Time+Expense! |
|
You can re-sync again at any point when data has been
changed in your accounting software (for example when you hire a new
employee or add a new customer).
After sync'ing for the first time, you might have extra data
that is not needed in Virtual Time+Expense (for example employees that wont
submit time, or customers that you will
not submit time to). Take the time to edit each one and make them
inactive within Virtual Time+Expense, and this will keep the lists of data
relevant and as short as possible.
An example to de-activate a project named "Demo": |
-
From the 'Admin'
area, click on 'Projects' from the 'Admin Data' section.
-
Click on the projects name to edit it (in this example, 'Demo')
-
Uncheck the 'Active' (to make it not active), then click the Save button
at the bottom of the page.
|
If you are setting up your data for the first time from the 'Getting Started
- Admin' help page, you should return to those instructions now.
 |
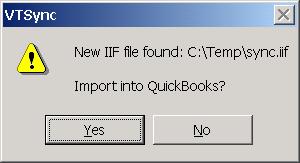
When you download your billables or payables from Virtual Time+Expense,
select "Open" and VTSync will automatically start, or save the file in a
common directory (like "C:\Virtual Time+Expense") and run VTSync to open it.
Once complete, you will be shown a summary of what was imported.
Its that easy!
|
|