Using Virtual Time+Expense with ADP Payroll Software
Virtual Time+Expense can export W2 gross payroll information directly into ADP Pay Expert or ADP PC/Payroll. This keeps you from having to reenter data by hand, and is one of the many time saving features of Virtual Time+Expense.
The information below explains how to get started.
1) Setting Up the ADP Software for Paydata Import
ADP Pay Expert |
|
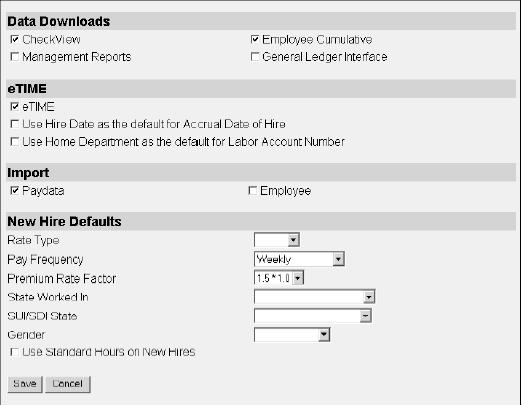
| Setup the Company for paydata import by opening the company options page (Setup tab, Company Options, View/Edit), and select "Paydata" in the import section. |
 |
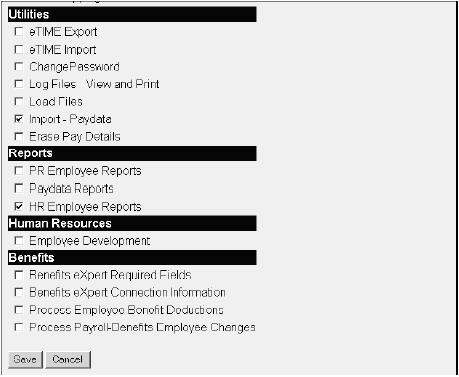
| Setup the User Profile for paydata import by opening the User Profiles page (Setup tab, User Profile, View/Edit User Profile), and select "Import - Paydata" in the Utilities section. |
 |
ADP PC/Payroll |
|
| Setup the Company for paydata import by opening the company options dialog (Setup, Company menu option), and select "Paydata" in the Import section. |
 |
2) Setting up Virtual Time+Expense for ADP Payroll
When you enter your employees in ADP they are each assigned a unique "file #" to identify them. For Virtual Time+Expense to export payroll information correctly, you will need to edit each W2 user and put the ADP file # in the Number field. This can be done easily from within Virtual Time+Expense - from the Admin area, click on Users, click on a User's name that is a W2 employee, and enter the file # in the "Number" field. Be sure to save the changes before editing the next employee.
Next you can set ADP as your default payroll software - from within Virtual Time+Expense, go to the Admin Area, click on My Company and select ADP as the Payroll Software within the Payables section. You can always override the default by selecting ADP or any other accounting software during a Payables download.
You can verify all your employees have the correct Number assigned to them by running the "User Summary" report. If you have selected ADP as your default payroll software (above), W2 employees that do not have an assigned Number will be shown in red.
3) When to Import Paydata
When you are ready to create your W2 payroll, you download the W2 gross payroll from the Payables area of Virtual Time+Expense (make sure you select ADP as your software). Virtual Time+Expense will name the file for you, but make sure that it is correctly named EPIcccVT.CSV, where ccc is your ADP company code (2 digits add '_'). For PC/Payroll, you must save the file to the "C:\ADP\PCPW\ADPDATA" folder where you installed ADP.
In ADP, you import this file during the paydata entry part of the payroll cycle. Typically, this is after you have added any new employees and enter any changes to employee information. Once paydata tasks are complete and all paydata batches are in balance, you create the Payroll Transmission file. If you prematurely create the Payroll Transmission file before importing paydata, you must reset the payroll cycle to allow for paydata import.
You can view or print the log file after the paydata import process finishes. The log file lists the processing statistics, errors, and warnings related to the file that you process. The log filename for the paydata import process is EPIPccc.LOG, where ccc is your ADP company code. For PC/Payroll, this is located in the "C:\ADP\PCPW\ADPLOG" folder.
After importing paydata, remember to verify each of the batch totals using the Verify Batch Totals option in ADP.
Once you import paydata, you may need to change or enter data that, for some reason, failed the import process. To locate imported paydata in ADP Expert, open the Select Paydata Entry Batch page (Paydata tab, Batch entry, Edit Batch). Then select the name of the batch (VT) that contains the paydata you want to edit in the Batch ID field.
Continue processing payroll as you would normally do within ADP to create the Payroll Transmission file.
For more information on using ADP Payroll, consult the ADP help manual or contact your ADP representative.